Monday, October 31, 2016

A heckuva deal

So I want to take this moment to skip ahead a little bit. I'm about to make some rather time consuming mistakes and in my anticipation I want to gloss over some boring and fairly correct construction. The difficulty will be in the explaining. Pictures of course are helpful, but lighting and perspective are not things I readily do a fair job of manipulating when I start clicking away. So if this paragraph is already sounding like an apology for the rest of the content and a rationale for how poorly the explanation will be, you're correct. I buggered some things up, sorry.


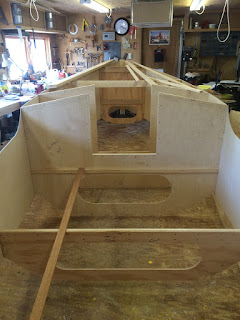
These pictures look innocent enough. I screwed down the first ply of a two ply bottom then worked the bilge panels into place and started stitching them together. With the bilge panels in place I noticed my first red flag. Near the rear of the boat, at station 11 the bilge panels had some serious overlap with the bottom. I worked them back and forth and found no happy compromise between the overlap. However, they fit quite nicely from the stem back to this point, thus I determined that it wasn't just me getting crazy with the jigsaw, but something is wrong with the bulkhead at this location. 

A trick Papa recommended doing from time to time on any curved surface to check for fairness, was to lay a batten strip over the area in question, stretching the batten strip as far as possible to see how a natural bend out to look. Starting at the front, I was pleased to see the curves stretching from the bow towards the middle of the boat looking fine on both the bilge panels and the bottom. However, when I laid the batten on the bottom from stern to bow, I saw a gap under the strip, nearly an inch, stretching the width of the bottom.

Okay okay don't tell me, "wait Calvin didn't you say something about a bulkhead being too short when you were assembling and you were going to piece something under it?"

Yeah and I did okay, there it is right there. That little piece glued under the bulkhead fills the gap wonderfully from the corner to the limber hole. "Yeah, that looks good, so you must have put a strip under the entire width of the bulkhead too, but wait it looks like the bottom is already glued on in this picture...and you're doing the fillets of epoxy already...so, that means..."

Yeah it means my bottom ply has an enormous dip in it at this spot and it's not coming apart without some serious destruction. Again, like pretty much everything in life, the extra minutes you spend in accurately preparing your foundation save you hours later in patchwork solutions.

Can I fix it? Yes. Do I need to? Define "need." Papa says nobody may ever know it's there, but you always will. Yeah, I need to fix it. If nothing else, the bottom is about to get some serious reinforcement and as it happens, right under where 500 lbs of ballast will be mounted someday. I'm okay with this. Granted the plans already call for a stout 1 inch thick bottom, but what the hell, I'll put two layers of fiberglass over it later too, just so I can feel better about all the beaches that I'll be running her up on.


Now I've noticed when I make a mistake that I can't quite fathom the consequences of, I stand back and make sort of a "huh" sound. You know how midwesterners are so darn nonjudgmental out loud, all while stewing their brains out inside and looking for an exit. When you're out at a local social gathering and you mention to some new aquantences how you used to take your favorite pet chicken sledding when you're were a kid.

"That's different."

Yeah you bet the hell it was different. Anyway without going into my childhood definition of a good time any further, I tap my inner Minnesotan. I stand back and say "huh, interesting." Papa doesn't say anything. His mind is looking for solutions already while mine is whirring about deconstructing social and cultural differences of the northern American homo sapient.

"You can fill in the space with pieces of 1/4" plywood and this fiberglass matting, gaining nearly an inch in the center, the deepest part, and feathering it by stepping the thickness down." Brilliant, and when it's all complete the second full ply will cover the mess and hopefully have a gentle, beautiful, and fair curve from end to end.

Don't worry, if you thought this bullet just got dodged, it didn't. I just pushed the issue from the bottom to the sides. With the bottom looking fine, we get the batten back out and find some interesting bilge panel shape. Good thing I like sanding.

That's different.


Friday, October 14, 2016

Some stability in my life.

 With the recent assembly party, I have something vaguely boat-ish looking, but it's woefully unstable at the moment and in need of some rigidity. I swear this is not a metaphor for the rest of my life, but lets just say it would do us both some good to shore things up a bit. For now, I'll start with the boat, easy target I say.

Papa had a handy jig laying around from past projects which is perfect for cutting the angles on any 1x2 boards for scarfing. I have two rub rails to install. One stretching 18' from bow to stern and the other stretching about 12' from the rear of the cabin to the bow. This will give a lot of stability in the meantime until the bottom is secured later.


However, before I could install the rub rails, I did have to make the beam which will eventually support the fore cabin decking. It also gives a little more shape to the front third of the hull. My first lap joint attempt was going beautifully until I measured and failed to account for the proper angle. Sooo I pieced in a a block, trimmed the ends, a little sanding and poof. All better.

Now the final touch for the day. Centerlines are drawn on all bulkheads and forms and now comes the moment where I can assure that they are all aligned and I don't end up with a crooked boat. Papa has been teaching me to trust my eye. The lines of a boat should always be fair and pleasing to the eye. If they are not, then you can set about doing something about it. In this case, the centers look good, I tighten the screws on the rub rails and feel happy that I have a little stability in my life.

Monday, September 26, 2016

So a maple man, a mail man and a tall guy walk into a shop...

Gramma says I have some really great friends so I'd like to reiterate that I've got some really REALLY great friends. The sorts of folks who come help at a moments notice until late into the evening without the slightest promise of doughnuts or dinner. Thankfully, Gramma is incredibly thoughtful and provided cookies and coffee to the crew.


Eben, or the "maple man" as Gramma calls him, lends his sticky hands to the work after working long days prepping his maple syrup operation. He is polite to a fault, washing his hands to avoid getting sticky paw prints all over my smooth birch plywood. I'm glad I haven't used any maple sticks in this constructions, otherwise Eb might start installing taps when I'm not paying attention.


Joel, or the "mail man" is actually a mailman. His beard and gentle demeanor allow him to brave 


both bad weather and bad attitudes as he brings your unwanted property tax statements and IRS audits. He also sports the most authentic "Minnes-oh-tan" accent of anybody I know. He also uses "youbetcha" as a normal part of everyday speech.

Sam, or the "tall one" (thanks again Gramma) has everything the typical redhead has. He is an overflowing well of good luck, good skill, bad eyesight, but somehow avoided having a temper of any kind. He's probably the most competent carpenter of the bunch and can easily reach things that I would otherwise have to jump for.
 So with the crew assembled and storytelling diminishing, we begin to piece together the bulkheads, frames, transom and stem. The extra hands make it remarkably easy to balance and adjust otherwise awkward lengths of wood. Someone gets the epoxy mixed, someone drills pilot holes and countersinks, while another mans the stainless screws. Suddenly, the whole works stands up on it's own.

I am giddy with excitement, but I find a mistake to bring me back to the level. My main cabin bulkhead is about a half inch too short when we line it up against the hulls sides. Without thinking too much further, I decide to level the top edge and confront the fact of having to install some shimming underneath the bulkhead before the bottom of the hull will go on. I feel a twinge of pain in my frontal lobe everytime I make an error like this as I mentally calculate how many extra minutes(hours) of sanding it will take to properly rectify the boo-boo in question.

With glue set and screws driven, we are all suddenly confronted with something very boat shaped. Not only boat shaped, but big boat shaped. We slide it from side to side just to have adequate walking space around.

Even more exciting now, the rub rails will go on next and then the great friends will be needed again to roll this thing over. I can feel myself bouncing along the waves already.


Tuesday, August 23, 2016

Batten down the Hatches

With the bulkheads, transom and bow stem ready to go, the side panels of the boat are next. These are made from 1/4" birch plywood and full 4x8 sheets will be joined by butt blocks to acheive the necesary length. The butt blocks are made from extra 1/2" plywood, secured with nails and glue.

The plans offer a breakdown of points to be plotted on the sheets of plywood in order to be connected and thus give the gentle curves necesary for a fair shape.

At each point, I drive a small finishing nail to act as a rest for the long batten board that will be bent to act as my guide. I burn through a lot of pencil lead to get all the necesary lines. I also mark the location of each bulkhead on the inside and outside of each side panel.

After all the lines are checked, double checked and finally checked by someone who knows what they're doing(Papa), I settle in for another long date with the jigsaw.


 With one side finished, it's a bit quicker to simply flip the works over and trace the outline for the starboard side, remembering to put the butt blocks on the inside and marking all bulkhead locations correctly. Don't think I didn't almost screw this up, because I did. Luckily the little penciled scribbles all over will be quite covered on the finished product.

One more long date with the jigsaw and it'll be time for a party with friends. It's finally time to make something that looks like a boat and the many hands will be very helpful.


Thursday, April 7, 2016

A Long Term Relationship

After several long evenings on dates with the jigsaw. I'm confronted with an emotional twist. This sticky new character is about to get fully intertwined in my life. Like, in my clothes, hat and hair. There won't be a moment where I'm not reminded just how attached I've become. This appears to be the beginning of a long term relationship. Things are getting serious. 6 gallons is not a commitment to be taken lightly.
The epoxy is a little different than what I'm used to. I purchased a "non-blushing" variety which doesn't produce the waxy film after curing. Because of this I can avoid a lot of time consuming sanding between coats. Papa gives me a digital scale which can zero itself, making the 2:1 mixing very simple. There's some terminology I have to learn since the epoxy is used for so many different functions.

"Epoxy" proper is unthickened. It is a little thinner than honey and will flow and drip out of everything. It is a pipe dream to believe that you can catch all of the drips, the stuff seems to just keep moving until it hardens. 

Today we'll be gluing the edge pieces onto the bulkheads. "Glue" is usually thickened with a very strong filler like Colloidal Silica. The consistency is about that of peanut butter(think the natural kind, not the hydrogenated oil kind). The surfaces are well coated on both sides and when compressed, a small amount should squeeze out. It is absurd how strong this bond is and absurd how hard it is to sand. Again, the idea being that we could pull all of the fasteners later if we wanted.


Cake Frosting
 "Fillets" are joints made from epoxy mixed with a softer filler like Phenolic Microballoons(fun to say too). This filler is easy to sand and when mixed up right looks like cake frosting. It doesn't help that you squeeze the filleting blend out of a plastic bag just like a cake decorater. That part always make me hungry.

Bulkhead 11 ready for limber holes


Limber hole
Most of the bulkheads are designed with limber holes cut out of the bilge corners to allow water to pass between bulkheads and pool in the lowest part of the boat.
In the event of a capsize, this facilitates pumping out the accumulated water and drying the inside of the boat. Using a pint sized paint can, I trace the shape and cut it out of the corner to make the space.

Bevel Board
Each bulkhead, including the transom and stem has some sort of bevel cut along its outside edges to accommodate the curve of the sides of the boat. Papa offered some professional advice at this point and explained that a professional boat builder would make a bevel board to show each angle to be cut at a glance and using a bevel square/angle finder each bevel can be marked and checked.

Bulkhead 2 with a finished bevel
Most of the bevels are very slight for this boat design, a few barely noticeable, but others would make for a dramatic effect if cut too deep or too shallow. I cut the stem with the table saw and used power and hand planers to work the bulkhead bevels out.

Finished Stem


The boat is getting dangerously close to taking a vague boat-like shape. I'll need friends for this next part and then the dreams can begin to really rattle around in my head as I imagine myself in this space we are creating.

Saturday, March 19, 2016

A Pile of Lumber

 It's been cold. -15F every morning this week. I drive down toward the lakeshore and pass a tree removal company, the workers in their Carharrt suits, trimming from the top of their bucket truck. The lake is calm and intimidating. It's on the cusp of freezing. I shudder at the thought of being on the water, but take some comfort knowing that Papa's shop is heated.


Today we start laying out bulkheads and forms. The plans show all of the individual sheets of plywood and how each piece is pulled out. We number the sheets and I begin to realize that the jigsaw is about to become my best friend. Papa shows me how to scale the drawings with a ruler. 1 inch equals 1 foot. We double check dimensions, Papa is very thorough in verifying my moves as I measure and cut. I find myself rushing, going too fast, and making mistakes.


Slowly, the pile of plywood turns into an assortment of shapes. We decide to leave the transom solid for the time being, because I'd like to cut a more aesthetically pleasing motorwell. The current angle cut shown on the plans, accommodates a small outboard and the tiller, but a bent tiller handle could be used to go over the top and a smaller opening for the motor could be used. I'm constantly trying to visualize the final product, because this type of building is so new.

There will be lots of time spent on details(and sanding) later, but I use them as a carrot to keep me focused on the big picture and the next step.


Wednesday, March 9, 2016

Picara

Papa and I had several conversations about this. I asked him to be the voice of reason.

I had to pick a design. Visions of the bow crashing over swells on the inside passages of the Pacific Northwest, Jack my dog standing on the bow looking heroic in the rabid seas as the sails are filled with wi--I need to pick a design. Something kind of simple. Something that could conceivably round cape horn while keeping me and my love afloat, I'd squeeze her closer as the rain is driving into us and threateni--I NEED TO PICK A DESIGN. I swear I'm not prone to over romanticizing or daydreaming.

Okay I want a sailboat. Check. I want it to have a cabin. Check. And, uh, sails. Check. Jack should be able to fit. Courtney too. Oh and Scout, her dog. Maybe a cat, two cats? Wait am I building a sailboat or an ark? What's the difference? They both float right?

I really don't know anything about sailboats, or sailing. Papa said look at Jim Michalak's plans, keep it under 20 feet long. He says the amount of fun a boat is, is inversely proportional to it's size. Plus I need to learn how to sail. I keep reminding myself.


 How about this one?

Yeah that looks good. I've seen one before.

Can I learn to sail in it and take it to Alaska?

Well...I think you could.


That's all the encouragement I need!
 Plans are ordered. Shopping lists made. But lets look at the shop for a moment. Wait how long is this boat supposed to be...18ft! And 6ft wide!

The working space in the shop is about 20 ft by 10ft. The tools can be shuffled around as needed. Rolling the hull will be interesting. It should fit out the door.

I notice at this point that I'm getting way too excited. It's probably best to do something to give me a reality check, something that always dampens my spirits, something like shopping.


I'll start with a pile of plywood, a few handfuls of quality pine sticks and 6 gallons of epoxy. I want to make a quality boat and opt for better than most grade materials. The 1/4 plywood is a 5 ply Baltic Birch which Papa has done some testing on to ensure the glue holds up. It's sanded on both faces and quite pleasant to work with. The 3/8 and 1/2 inch plywood are marine grade, aka expensive, quite rough and prone to splintering. I've already made my peace with the needle and peroxide.

All of the fasteners that will be left in the boat are stainless steel. The nails are ringshank and impossibly hard to remove. The screws are square drive and somewhat slip resistant, but occasionally round out under weak pressure. The idea is that everything is actually held together with epoxy. The fasteners could be removed after the glue cures and be just as strong. We'll leave them in anyway for good measure.

The real work is about to begin, but first a little about the design.

Picara - A woman who is a rogue or adventurer
I found the design off of Duckworks Boat Building Supply - duckworksbbs.com
Jim Michalak has an extensive listing of plans on this site and more resources on his own site - jimsboats.com

Jim's plans are geared toward beginner boat builders and are therefor very user friendly. He also gears his plans toward commonly obtained materials and common dimensions. Outside of the epoxy and fiberglass, everything else for the hull construction can be found at Menards or an equivalent lumber yard.

This is a first boat for me besides a wooden kayak I built as a kid and I felt that it would be an ideal starting place to hopefully launch a lifelong obsession(like I really need another one, don't get me going about motorcycles).

The second part of this story, meaning much more than the adventurous pipe dream in my head and the nuts and bolts of construction, is that this is my opportunity to learn from my Grandfather, something he knows well and loves dearly. It's truly a once in a lifetime opportunity to learn skill and technique, to hear the stories and lessons learned and spend quality time with someone who means a lot to me. We may be building a boat, but it's everything that happens in between that truly matters.

The Supreme Moment

Do you remember when I said you could have the shop?

Yeah, when you had me paint it for you.

Yeah, but to use if you wanted to build a boat.

A boat. What sort of boat?

Any kind of boat.

How big?

As big a boat as can fit.

Like a sailboat?

Any kind of boat.

Won't I be in your way?

I'm done building boats. I'll help you build yours.

How many boats have you built?

31

Okay. I'll build a boat.


-Kairos (καιρός) is an ancient Greek word meaning the right or opportune moment (the supreme moment).

-a time when conditions are right for the accomplishment of a crucial action :  the opportune and decisive moment