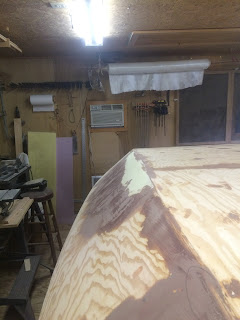
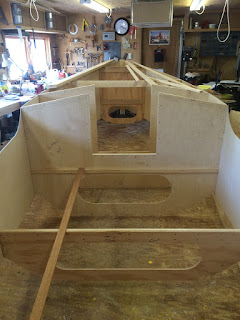
Back at it with a little more vigor than the last year allowed. Scanning through the photo archives shows some pretty serious gaps in progress. Life gets busy blah blah blah you know the rest. I recall Papa telling me something like 70% of wooden boats never get finished. A frightening statistic that I have no plans to be involved in.
There's a couple of keys events to highlight. Beginning with the most dramatic, the boat has been moved and not in the usual graceful fashion that most are. There was no water involved and not even a proper trailer. Why, we'll just toss it in slings and heft it down the hill I said. My friends all give me the same measured tone in their replies. I am blessed with understanding friends who are willing to go along with a half baked idea. It helps that we're all still fairly young, strong and uninjured.
Turning it on its side was the only way to get it both out of the shop and into my basement. I can't remember how many times I answered the question, "did you measure?" Yes I measured.
I improvised an older trailer of Papa's, making a bed of cross members for the boat to sit on. Trucker straps around the whole works ensured that it wouldn't walk away without us noticing on the slow drive to town.
Up until I had to lift it up, I had estimated the weight at somewhere around 500-600 pounds. However, the extra epoxy, fiberglass, and matting on the bottom was making itself known. Not to mention that I got the anti-fouling paint on too, so a couple extra pounds of copper.
Huck and I had recently moved a few of his cast iron radiators around his house so he could refinish his floors. He had estimated the largest of them to be 400+ and with the boat sling burning into my shoulder I was pretty certain that my boat was nothing more than a radiator intent on crushing all of us.
So If I had to guess, and boy do I love guessing, I'd say this boat is pushing 800 pounds already. 'Course you know how guessing goes, it's what got this whole mess started in the first place.
Next question please, "how are you gonna get it out of your basement?", asks the peanut gallery" "Roll it on some PVC," answers the guessing man. Makes me think maybe I should find an actual boat trailer soon before it gets much heavier.
The 32nd Boat
Saturday, January 5, 2019
Monday, December 4, 2017
I've got that glassy eyed stare.
Since applying fiberglass is pretty straight forward, I'm not going to include much of a write up here. As I mentioned before, I'm overlapping the seams heavily and neglecting to tape them. The front 4-6 ft of the bow has 6 layers of glass, the bottom has 2 layers on the flat, and all the chines and bilge panels have 4.
I can say with confidence that at this point it will float.
I now have many hours of sanding and bondo ahead of me. The smell of bondo takes me back to being a toddler again and the sound of a random orbital makes my hands tingle. In a few weeks I'll flip this thing over and start playing house inside.
The first step to get out of a hole? Stop digging.
I had to take a deep breath after the fiasco with the bottom. It gave me a lot of comfort to know that the bottom was not only very very sturdy after all that matting and filling, but I got the shape I wanted. The pictures never really show mistakes all that well, but even here the 1 inch plus gap under the batten strip would show up.
So after picking all of the fiberglass bits from my hair, mouth and clothes, and breathing a nice sigh of satisfaction I turned my attention to the new issue. The bilge panels.Papa sent me to get a sheet of 3/4 inch extruded polystyrene from the lumber yard. There will be some custom shaping to get the lines right. I decided to roll the dice and go to Two Harbors Lumber to see if they had some on hand. Gene has been running the lumber yard for at least a hundred years and the inventory can be a crapshoot. He and his mom run everything in true small town fashion. I recall buying a pair of boots there years ago and had forgotten my wallet. Gene's mom wrote me out an honest to God IOU and pinned it on their bulletin board. That's not something I'd expect anywhere, but it made my heart swell a bit and of course I came back with a check later that afternoon.
On this day I showed up and Gene rummaged around in one of his half empty tin buildings and found a few sheets of 3/4." He kind of scratched his head and asked why I only needed one sheet. When I told him it was for a boat I'm building he didn't ask any other questions about it, but commented "you could just dig a hole and throw money in it too..." I laughed nervously, thinking of how much I'd already spent and knowing my current materials would only net me a semi-finished hull. I don't remember what he charged me, but it was surprisingly low for Gene's standards and I'm guessing he must have felt something like pity for me. If only he knew that I would be swimming in foam dust for days.
The basic idea was to outline some low areas using the batten strips on the curved surfaces of the bilge panels and a straight edge on the sides of the hull. Then glue on a panel of foam and sand it and feather it until the hull is fair in all directions. The pictures don't really show the issues and sometimes, due to optical delusions, the lines look crazy when they are finally quite fair.
Once the foam was about right, I mixed up some filler, made a mess and then sanded most of it off. It reminded me of hanging drywall, but using really expensive, hard to sand, mud.
Anyways, you get the idea. When I asked Papa how strong the foam would be. He showed me a set of plans for a trimaran and pointed out that the outriggers were constructed entirely of foam and fiberglass. He said in his experience, you could take a hammer to the hull and the fiberglass would determine the durability, not the foam.
Speaking of fiberglass...There happens to be a giant roll of it hanging from the ceiling in most of my pictures. Well it's finally going to get it's day. And durability? Yeah I'll be doing two layers with wide overlaps and forgoing the taped seams.
Monday, October 31, 2016
A heckuva deal
So I want to take this moment to skip ahead a little bit. I'm about to make some rather time consuming mistakes and in my anticipation I want to gloss over some boring and fairly correct construction. The difficulty will be in the explaining. Pictures of course are helpful, but lighting and perspective are not things I readily do a fair job of manipulating when I start clicking away. So if this paragraph is already sounding like an apology for the rest of the content and a rationale for how poorly the explanation will be, you're correct. I buggered some things up, sorry.
A trick Papa recommended doing from time to time on any curved surface to check for fairness, was to lay a batten strip over the area in question, stretching the batten strip as far as possible to see how a natural bend out to look. Starting at the front, I was pleased to see the curves stretching from the bow towards the middle of the boat looking fine on both the bilge panels and the bottom. However, when I laid the batten on the bottom from stern to bow, I saw a gap under the strip, nearly an inch, stretching the width of the bottom.
Okay okay don't tell me, "wait Calvin didn't you say something about a bulkhead being too short when you were assembling and you were going to piece something under it?"
Yeah and I did okay, there it is right there. That little piece glued under the bulkhead fills the gap wonderfully from the corner to the limber hole. "Yeah, that looks good, so you must have put a strip under the entire width of the bulkhead too, but wait it looks like the bottom is already glued on in this picture...and you're doing the fillets of epoxy already...so, that means..."
Yeah it means my bottom ply has an enormous dip in it at this spot and it's not coming apart without some serious destruction. Again, like pretty much everything in life, the extra minutes you spend in accurately preparing your foundation save you hours later in patchwork solutions.
Can I fix it? Yes. Do I need to? Define "need." Papa says nobody may ever know it's there, but you always will. Yeah, I need to fix it. If nothing else, the bottom is about to get some serious reinforcement and as it happens, right under where 500 lbs of ballast will be mounted someday. I'm okay with this. Granted the plans already call for a stout 1 inch thick bottom, but what the hell, I'll put two layers of fiberglass over it later too, just so I can feel better about all the beaches that I'll be running her up on.
Now I've noticed when I make a mistake that I can't quite fathom the consequences of, I stand back and make sort of a "huh" sound. You know how midwesterners are so darn nonjudgmental out loud, all while stewing their brains out inside and looking for an exit. When you're out at a local social gathering and you mention to some new aquantences how you used to take your favorite pet chicken sledding when you're were a kid.
"That's different."
Yeah you bet the hell it was different. Anyway without going into my childhood definition of a good time any further, I tap my inner Minnesotan. I stand back and say "huh, interesting." Papa doesn't say anything. His mind is looking for solutions already while mine is whirring about deconstructing social and cultural differences of the northern American homo sapient.
"You can fill in the space with pieces of 1/4" plywood and this fiberglass matting, gaining nearly an inch in the center, the deepest part, and feathering it by stepping the thickness down." Brilliant, and when it's all complete the second full ply will cover the mess and hopefully have a gentle, beautiful, and fair curve from end to end.
Don't worry, if you thought this bullet just got dodged, it didn't. I just pushed the issue from the bottom to the sides. With the bottom looking fine, we get the batten back out and find some interesting bilge panel shape. Good thing I like sanding.
That's different.
These pictures look innocent enough. I screwed down the first ply of a two ply bottom then worked the bilge panels into place and started stitching them together. With the bilge panels in place I noticed my first red flag. Near the rear of the boat, at station 11 the bilge panels had some serious overlap with the bottom. I worked them back and forth and found no happy compromise between the overlap. However, they fit quite nicely from the stem back to this point, thus I determined that it wasn't just me getting crazy with the jigsaw, but something is wrong with the bulkhead at this location.
Okay okay don't tell me, "wait Calvin didn't you say something about a bulkhead being too short when you were assembling and you were going to piece something under it?"
Yeah and I did okay, there it is right there. That little piece glued under the bulkhead fills the gap wonderfully from the corner to the limber hole. "Yeah, that looks good, so you must have put a strip under the entire width of the bulkhead too, but wait it looks like the bottom is already glued on in this picture...and you're doing the fillets of epoxy already...so, that means..."
Yeah it means my bottom ply has an enormous dip in it at this spot and it's not coming apart without some serious destruction. Again, like pretty much everything in life, the extra minutes you spend in accurately preparing your foundation save you hours later in patchwork solutions.
Can I fix it? Yes. Do I need to? Define "need." Papa says nobody may ever know it's there, but you always will. Yeah, I need to fix it. If nothing else, the bottom is about to get some serious reinforcement and as it happens, right under where 500 lbs of ballast will be mounted someday. I'm okay with this. Granted the plans already call for a stout 1 inch thick bottom, but what the hell, I'll put two layers of fiberglass over it later too, just so I can feel better about all the beaches that I'll be running her up on.
Now I've noticed when I make a mistake that I can't quite fathom the consequences of, I stand back and make sort of a "huh" sound. You know how midwesterners are so darn nonjudgmental out loud, all while stewing their brains out inside and looking for an exit. When you're out at a local social gathering and you mention to some new aquantences how you used to take your favorite pet chicken sledding when you're were a kid.
"That's different."
Yeah you bet the hell it was different. Anyway without going into my childhood definition of a good time any further, I tap my inner Minnesotan. I stand back and say "huh, interesting." Papa doesn't say anything. His mind is looking for solutions already while mine is whirring about deconstructing social and cultural differences of the northern American homo sapient.
"You can fill in the space with pieces of 1/4" plywood and this fiberglass matting, gaining nearly an inch in the center, the deepest part, and feathering it by stepping the thickness down." Brilliant, and when it's all complete the second full ply will cover the mess and hopefully have a gentle, beautiful, and fair curve from end to end.
Don't worry, if you thought this bullet just got dodged, it didn't. I just pushed the issue from the bottom to the sides. With the bottom looking fine, we get the batten back out and find some interesting bilge panel shape. Good thing I like sanding.
That's different.
Friday, October 14, 2016
Some stability in my life.
With the recent assembly party, I have something vaguely boat-ish looking, but it's woefully unstable at the moment and in need of some rigidity. I swear this is not a metaphor for the rest of my life, but lets just say it would do us both some good to shore things up a bit. For now, I'll start with the boat, easy target I say.
Papa had a handy jig laying around from past projects which is perfect for cutting the angles on any 1x2 boards for scarfing. I have two rub rails to install. One stretching 18' from bow to stern and the other stretching about 12' from the rear of the cabin to the bow. This will give a lot of stability in the meantime until the bottom is secured later.
However, before I could install the rub rails, I did have to make the beam which will eventually support the fore cabin decking. It also gives a little more shape to the front third of the hull. My first lap joint attempt was going beautifully until I measured and failed to account for the proper angle. Sooo I pieced in a a block, trimmed the ends, a little sanding and poof. All better.
Now the final touch for the day. Centerlines are drawn on all bulkheads and forms and now comes the moment where I can assure that they are all aligned and I don't end up with a crooked boat. Papa has been teaching me to trust my eye. The lines of a boat should always be fair and pleasing to the eye. If they are not, then you can set about doing something about it. In this case, the centers look good, I tighten the screws on the rub rails and feel happy that I have a little stability in my life.
Monday, September 26, 2016
So a maple man, a mail man and a tall guy walk into a shop...
Gramma says I have some really great friends so I'd like to reiterate that I've got some really REALLY great friends. The sorts of folks who come help at a moments notice until late into the evening without the slightest promise of doughnuts or dinner. Thankfully, Gramma is incredibly thoughtful and provided cookies and coffee to the crew.
Eben, or the "maple man" as Gramma calls him, lends his sticky hands to the work after working long days prepping his maple syrup operation. He is polite to a fault, washing his hands to avoid getting sticky paw prints all over my smooth birch plywood. I'm glad I haven't used any maple sticks in this constructions, otherwise Eb might start installing taps when I'm not paying attention.
I am giddy with excitement, but I find a mistake to bring me back to the level. My main cabin bulkhead is about a half inch too short when we line it up against the hulls sides. Without thinking too much further, I decide to level the top edge and confront the fact of having to install some shimming underneath the bulkhead before the bottom of the hull will go on. I feel a twinge of pain in my frontal lobe everytime I make an error like this as I mentally calculate how many extra minutes(hours) of sanding it will take to properly rectify the boo-boo in question.
With glue set and screws driven, we are all suddenly confronted with something very boat shaped. Not only boat shaped, but big boat shaped. We slide it from side to side just to have adequate walking space around.
Even more exciting now, the rub rails will go on next and then the great friends will be needed again to roll this thing over. I can feel myself bouncing along the waves already.
Eben, or the "maple man" as Gramma calls him, lends his sticky hands to the work after working long days prepping his maple syrup operation. He is polite to a fault, washing his hands to avoid getting sticky paw prints all over my smooth birch plywood. I'm glad I haven't used any maple sticks in this constructions, otherwise Eb might start installing taps when I'm not paying attention.
Joel, or the "mail man" is actually a mailman. His beard and gentle demeanor allow him to brave
both bad weather and bad attitudes as he brings your unwanted property tax statements and IRS audits. He also sports the most authentic "Minnes-oh-tan" accent of anybody I know. He also uses "youbetcha" as a normal part of everyday speech.
Sam, or the "tall one" (thanks again Gramma) has everything the typical redhead has. He is an overflowing well of good luck, good skill, bad eyesight, but somehow avoided having a temper of any kind. He's probably the most competent carpenter of the bunch and can easily reach things that I would otherwise have to jump for.
So with the crew assembled and storytelling diminishing, we begin to piece together the bulkheads, frames, transom and stem. The extra hands make it remarkably easy to balance and adjust otherwise awkward lengths of wood. Someone gets the epoxy mixed, someone drills pilot holes and countersinks, while another mans the stainless screws. Suddenly, the whole works stands up on it's own.Sam, or the "tall one" (thanks again Gramma) has everything the typical redhead has. He is an overflowing well of good luck, good skill, bad eyesight, but somehow avoided having a temper of any kind. He's probably the most competent carpenter of the bunch and can easily reach things that I would otherwise have to jump for.
I am giddy with excitement, but I find a mistake to bring me back to the level. My main cabin bulkhead is about a half inch too short when we line it up against the hulls sides. Without thinking too much further, I decide to level the top edge and confront the fact of having to install some shimming underneath the bulkhead before the bottom of the hull will go on. I feel a twinge of pain in my frontal lobe everytime I make an error like this as I mentally calculate how many extra minutes(hours) of sanding it will take to properly rectify the boo-boo in question.
With glue set and screws driven, we are all suddenly confronted with something very boat shaped. Not only boat shaped, but big boat shaped. We slide it from side to side just to have adequate walking space around.
Even more exciting now, the rub rails will go on next and then the great friends will be needed again to roll this thing over. I can feel myself bouncing along the waves already.
Tuesday, August 23, 2016
Batten down the Hatches
With the bulkheads, transom and bow stem ready to go, the side panels of the boat are next. These are made from 1/4" birch plywood and full 4x8 sheets will be joined by butt blocks to acheive the necesary length. The butt blocks are made from extra 1/2" plywood, secured with nails and glue.
The plans offer a breakdown of points to be plotted on the sheets of plywood in order to be connected and thus give the gentle curves necesary for a fair shape.
At each point, I drive a small finishing nail to act as a rest for the long batten board that will be bent to act as my guide. I burn through a lot of pencil lead to get all the necesary lines. I also mark the location of each bulkhead on the inside and outside of each side panel.
After all the lines are checked, double checked and finally checked by someone who knows what they're doing(Papa), I settle in for another long date with the jigsaw.
With one side finished, it's a bit quicker to simply flip the works over and trace the outline for the starboard side, remembering to put the butt blocks on the inside and marking all bulkhead locations correctly. Don't think I didn't almost screw this up, because I did. Luckily the little penciled scribbles all over will be quite covered on the finished product.
One more long date with the jigsaw and it'll be time for a party with friends. It's finally time to make something that looks like a boat and the many hands will be very helpful.
Subscribe to:
Posts (Atom)